Pattern Testing: Jackie Sports Bra
I love that pattern testing provides me with the opportunity to try something new! This time I got to make the Jackie sports bra by Jennifer at Porcelynne.
*All opinions are my own for this blog tour/pattern testing review. The following post may contain affiliate links.
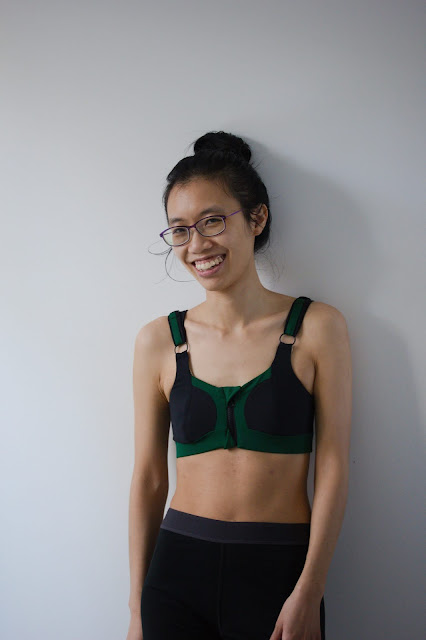
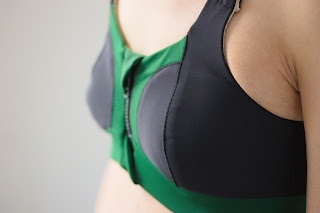
The sports bra features princess seams, a center front zipper closure and adjustable bra straps. This pattern comes with a ton of sizes (182 to be exact)! The size spans from 28A to 52N. She is also planning to include smaller/flatter bust options for youths. Talk about being inclusive with her sizing!
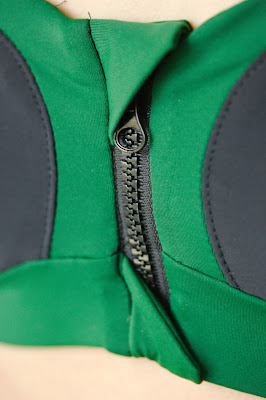 |
| Center Front Zipper detail |
First Glance at the Pattern Package
I love how Jennifer sets up the multi size file and have you turn on the appropriate size instead of deselecting a whole bunch - it’s very thoughtful of her to have this feature, and I wish all digital patterns are like that... sigh. There's also a projector file available, which makes lives for those of us who are #TeamProjector easier because she includes a layer for calibration!
Fabric and Notions (Provided Kit)
I was provided with a fabric kit and bra hardware, which saved me some headache of tracking down all the bits and pieces. But any 20-30% 4-way stretch fabric will do. I did really enjoy working with the stable athletic knit! I used the athletic knit and color blocked the design to further enhance the style lines - and I really like the look! For this version, I opted for a power mesh in my stash as lining instead of using the athletics knit. The only thing missing from the kit was regular elastic for finishing the neckline/armhole, and a tiny bit of interfacing for the zipper shield. But both are easily found in my stash or at a local fabric store.
The zipper I received from the kit was oriented opposite to how the bra zipper shield is setup. The zipper shield is attached to the right side of the wearer, but the zipper pull and bottom stopper is on the left side. So I had to take the zipper pull out, reverse it such that the bottom stopper is on the zipper shield (right side of wearer) instead of left when I received it. I don't know if that was necessary, but it didn't make sense to me to have the pull on the left. Perhaps it has something to do with the fact that I'm a righty. I think it is entirely possible to have the zipper shield reversed and attach on the other side if you are a lefty though.
If you've been following, you'll know that I had a lot of trouble setting up my vintage Singer 401 to sew lingerie fabrics/elastics properly. I still think I need a stretch needle, but since I haven't had time to place a Wawak order. Instead of fighting with the machine, because I would rather sew, I switched over to my beginner computerized sewing machine - the Brother CS 6000i. To my surprise, I was able to sew without any trouble--no skipped stitches-- with just a 90/14 ballpoint needle. I should attempt another bra with the computerized machine, but I digress.
 |
| Hello, Zipper! Side note: If you are interested in a kit, there is a kit available on the Porcelynne website. And if you wish to support me, here is an affiliate link to the Sports Bra Kit. I may get a small commission if you purchase from this link. |
Construction and Instructions
I will start off with saying this pattern is an advanced pattern, and includes a heck of a lot of pieces. The illustrations are minimal but very clear, and instructions are concise. Because there are so many pieces, some seams do end up being quite thick. There are no explicit instructions to grade seams, so you will have to rely on your own intuition and grade as you see fit. That is perfectly in line with an advanced pattern instructions though - so I definitely recommend reducing bulky seams as you go/see fit. In conjunction with the instructions, Jennifer also filmed a series of how to videos that shows every step in detail, which I find myself skipping the instructions to watch when I got confused with the instructions. The videos are very helpful for adventurous sewists, or people like me who just skip through the words and go straight for the illustrations.
I end up sewing the bra under the sewing machine instead of the serger because I got really lazy about going back and forth between the two machines. Jennifer recommends basting to keep the pieces stable for serging. I agree with her and think it's just a good practice with all the bits and pieces so it doesn't slip under the pressure foot.
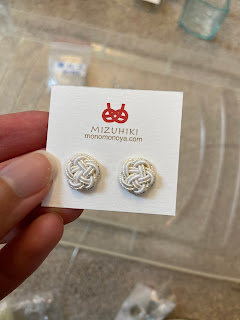
The bra strap calls for cut and sew foam, and I was provided a small piece. But I decided that my small, almost nonexistent, boobs don't really weigh that much and highly doubt that the straps would dig into my shoulders. I would recommend anyone with heavier bust not to omit the foam though.
 |
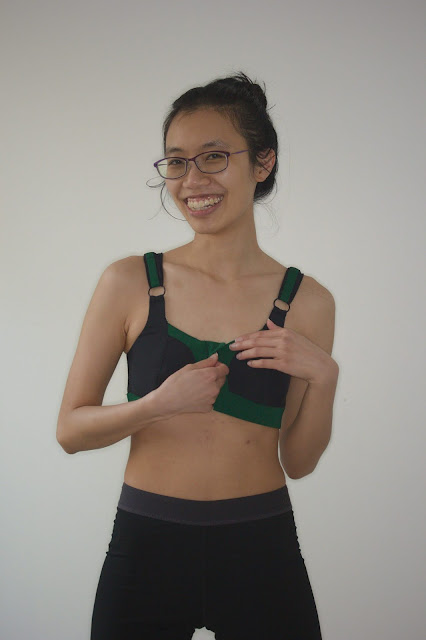
| I was smiling but really wondering if the lining is peeking out |
One thing I really, really appreciate is the clean finish on the exterior and interior of the bra. To have something this close to your skin and not clean finish is almost like a crime! There's elastic sewn to the neckline and armholes for a nice finish and for the bra to lay flat against the skin. I would recommend considering the elastic placement: I end up sewing it to the seam allowance and catching the edge of the elastic with the zigzag. Maybe I haven't sewn and catch the elastic perfectly, but I do find the lining wants to flip out due to the elastic. So, I would either top stitch the back neck and armhole opening to ensure no lining is peeping, or perhaps sew the elastic on the inside of the garment away from the seam allowance.
Size and Fit
I chose my size (28B) based on pattern recommendation. The bra is actually quite complicated with many pieces. I highly recommend making a muslin to test the size and fit. At the very least, I think you can pull off a quick and dirty muslin by skipping the zipper and making the lining plus straps.
 |
The first time I made it and put the bra on, I couldn’t breathe! Turns out, a correction needed to be made for the smallest size. After that pattern correction, however, I find the 28B a good fit. It actually fits like a compression sports bra for me, which is great because I have not yet found a bra like that in RTW. The next time I make it though, I might size up to a 30A to get a more relaxed fit. To be honest, I think I might need an alteration on my smaller bust, but I'm satisfied with the current fit.
An Itty Bitty Modification
After trying the bra on, I noticed that my nips were showing a bit. If I'm honest, my itty bitty titty could use a bit of oomph, if you know what I mean. So I used the provided piece of cut and sew foam to make a bra cup. I just grabbed an existing bra pattern I had (the Maya Bra), sewn the cups together and trim the edges until the cups aren't gaping on me. Slipping the cups between the lining and the self fabric, I just hand tacked the cups to the seam allowances of the self fabric and continued my merry way to finish the bra.
 |
| Bust cup detail with foam cup |
Final Thoughts
 |
Proof that I did a few sets during the photoshoot :P
 |
| Deadlifts |
 |
| Overhead Press |
 |
| Post mini-workout stretch |
Comments
Post a Comment